How do makeup artists create the perfect eye shadow?
There are hundreds of ways to create eye shadow. Each technique has its own purpose whether that be to create a natural look, a smokey look, a youthful look or to do some dramatic eyes. And each different technique might be more or less suited to you eye shape or your personal style.
Consider the following a good go-to technique, its very forgiving (so a good one to start with if you have a fear of eye shadow) and it also suits any eye shape. You can also use this technique to build on as you get better and better.
The recipe
1 x Dark colored eye shadow. This means a tone that is at least two shades deeper that your skin. You can use a color as deep/dark as your hair or eyes.
1 x Medium colored eye shadow. This one needs to be a shade darker than your skin tone and still lighter than your dark color.
1 x Light colored eye shadow. This one should be lighter than your skin, and can have some shimmer in it for that little extra reflective quality.
1 x finger (middle or ring finger will do fine). You can use a brush, but you don’t need to for this particular technique.
The Basic steps
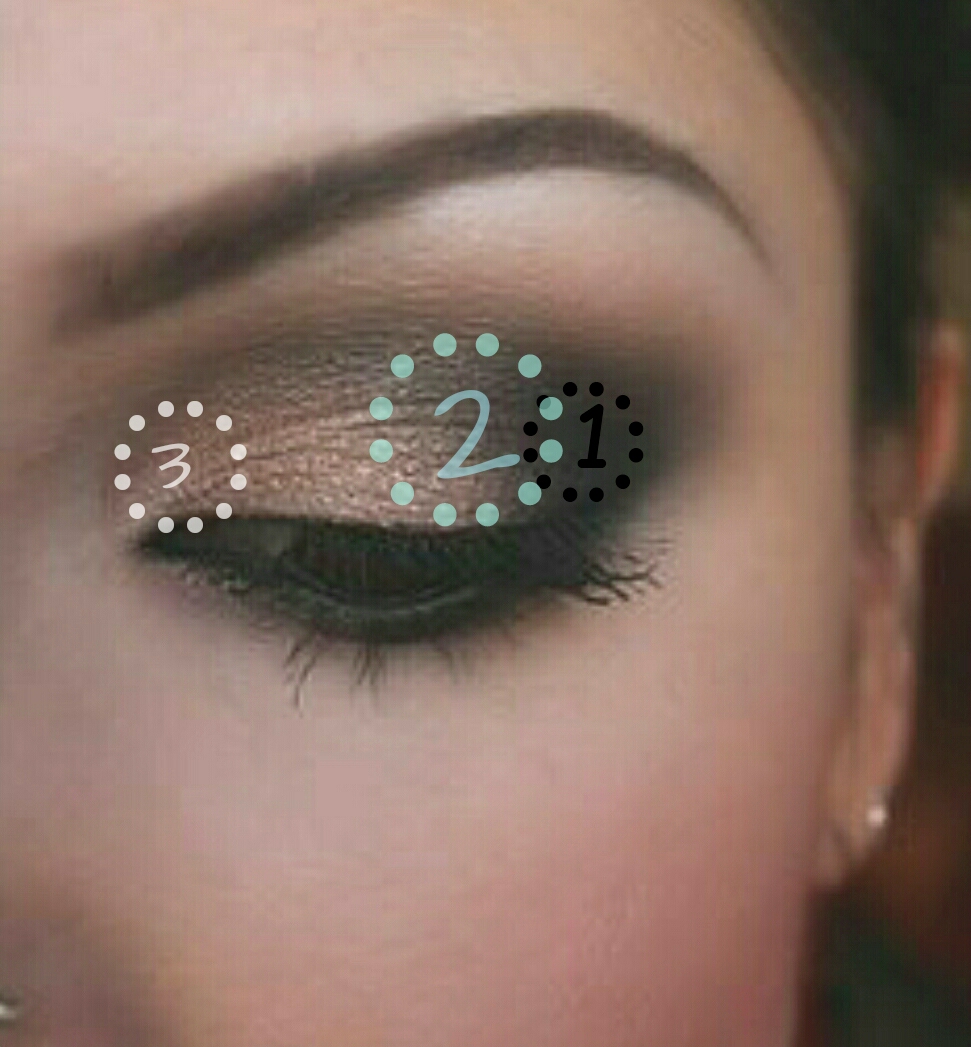
I promised this style was simple, but that doesn’t mean you slap it on. Read the instructions for a all the hints that make a blended look, well, blended. Imagine your eyelid broken into thirds, and you’re simply going to color in the outer corner dark, the inner color light and use your medium tone – yep you guessed it – in the middle.
Imagine your eyelid broken into thirds.
- Use your dark color eye shadow to create some serious depth, this will be on the outer corner of your lid. You want it dark, but very localised. You can see in the picture where I’ve drawn the #1 circle. It’s relatively small. If you make this area too big, then you get the always familiar ‘black eye look’. Get this bit blended by dabbing in little circles. And I insist on dabbing! I teach a lot of workshops so I can say with confidence you’re likley going to try dragging or rubbing, make sure you dab! Create a little circular area. Get right into roots of the corner lashes so that when your eyes are open you can see that depth. It might not look like a lot yet.
- Use your medium tone to make a slightly larger circle which may overlap your darker tone (it’s good to let it overlap a little so you get that blended look). The point here is that your medium tone will add the the illusion of blending by overlapping your darkest tone.
- Dab your lighter color in the very inner corner of you lid. This adds the curve shape to the eye, it creates that bright fresh youthful look. If you skip this step then you won’t get shape and depth in the eye shadow. Light and dark together make the illusion of depth.
The trick!
It’s the three shades all together that make the eye shadow look beautifully blended, this is why it’s important to read the recipe and choose the right colors. Also be sure to go for a dabbing motion with your finger. Or your brush for that matter. Dab, Dab, Dab! Dragging just over shoots the mark, and you’ll end up dragging away all your depth.
Happy Practicing! I love to share my secrets and experience. Something I try to tell women all the time is that you need to give it go as often as you can. There will be times when you make a mess – that’s ok! This is what cotton tips and tissues are for.